Tools needed to apply your decal:
Decal, Isopropyl alcohol, Tape Measure, Soft Cloth and a
Squeegee
Steps for applying your vinyl decal:
Step 1: Examine your surface
Make sure the surface that you want to apply your decal to is
smooth with no texture. Some plastics are textured or "rough" by
nature, you will want to avoid applying decals to surfaces of
this nature. Do not apply vinyl to rubber surfaces, it will
stick but it's only a matter of time before it peels off. The
best surfaces to apply a decal to are painted metal, glass and
smooth plastic surfaces. These surfaces will allow your decal to
adhere properly.
Step 2: Clean the surface
Cleaning your surface is the most important aspect of successful
vinyl decal application. You can use alcohol for the best
results. It is most effective in removing dirt, dust, road
grime, and small bits of adhesive. My favorite type of alcohol
is 91% isopropyl alcohol. You can buy this at CVS or if you need
a lot of alcohol you can buy an entire case here:
Isopropyl Alcohol Pint Pack Of 12.
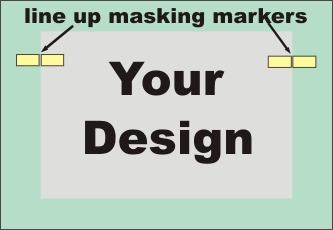
Step 3: Decal Placement
Tear off two small (1") strips of 3M
Economy Masking Tape and
apply one to the two top corners of your decal. This will allow
you to place your decal before you peel the backing off and
apply it. Place the decal in the desired location.
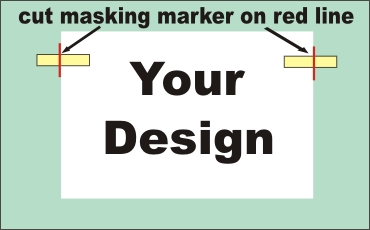
Step 4: Make sure your decal is level
Get our your trusty Empire
Measuring Tape and
make sure your decal is level. There are two obvious ways to do
this. The first way is to measure the distance between the
bottom of your decal to a straight line or edge on your surface.
Make sure you measure the left corner's distance, and then match
the right corner's distance so that your decal will be level.
The other method is normally used when you have a lot of
flat-bottomed letters to measure by. Basically you will measure
from the edge of your surface to the bottom of a flat letter on
one side of your decal. Using the same surface edge match the
distance to a letter on the other end of your decal. This will
ensure your decal is level.
Step 5: Tape your decal down
Now that you have your decal level and in place, you need to
secure the entire top edge with a long strip of your 3M Masking
tape. This creates a "hinge" that will allow you to apply your
decal in the most easiest manner.

Step 6: Apply your decal
The hinge you created in step 5 will allow you to "flip" the
decal up so you can peel off the backing. Flip the decal up and
peel off the backing half
way.
Only peeling the backing off half way will allow you to keep the
decal tight, preventing the edges from flopping down and
sticking prematurely. With the backing peeled back, take your
squeegee and lightly press down on the top part of your decal in
a horizontal sweeping motion. This will allow for a smooth
application with no bubbles or wrinkles. After you have applied
your decal up to the half way mark, you can then carefully peel
off the rest of the backing and continue to apply your decal.

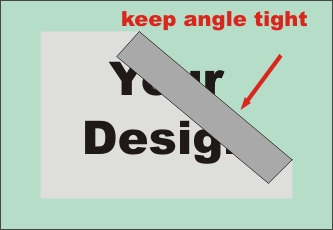
Step 7: Remove application tape
Take the top edge of your decal's application tape and start
peeling it off at a 45 degree angle. That's it you have applied
your first vinyl decal.
|
